
Synthetic slate roofing has become a popular choice for Tampa homeowners. It looks like natural slate but weighs far less and holds up better in Florida’s heat, humidity, and storm season. If you are thinking about installing synthetic slate on your home, it helps to understand what the process actually involves.
This guide walks you through how synthetic slate roofing is installed, which steps matter most, and what to look for when hiring a roofing contractor in the Tampa area.
Key Takeaways
- Synthetic slate is lighter than natural slate and works well in Tampa’s climate
- Proper deck preparation is essential before any shingles go on
- Each tile must be installed in a specific pattern to prevent leaks
- Flashing and underlayment are just as important as the tiles themselves
- Florida’s building codes affect how your roof must be installed
- Hiring a licensed local contractor reduces the risk of installation errors
What Is Synthetic Slate and Why Does It Work in Tampa?
Synthetic slate is made from materials like rubber, plastic, or a mix of both. It is designed to mimic the look of natural slate without the heavy weight or high cost. Natural slate can weigh between 800 and 1,500 pounds per square, while synthetic slate usually weighs around 50 to 200 pounds per square. That difference matters a lot for older homes that may not support heavy roofing materials.
Tampa’s weather puts roofs through a lot. The combination of UV exposure, heavy rain, and hurricane-force winds can quickly break down many roofing materials. Synthetic slate is built to resist all three. Many products are rated for winds of up to 110 miles per hour, which matters during Atlantic hurricane season.
Choosing the Right Synthetic Slate Product
Not all synthetic slate products are the same. Look for tiles that carry a Class A fire rating and a Class 4 impact rating. Class 4 is the highest impact-resistance rating and can lower your homeowners’ insurance premium in some cases. Ask your contractor which brands they recommend for the Tampa Bay area specifically, since local experience matters when selecting products that perform in Florida’s conditions.
How to Install Synthetic Slate Roofing: The Process Step by Step
Learning how to install synthetic slate roofing starts with understanding that it is not a simple DIY project. The process requires precision, the right tools, and knowledge of local building codes. That said, knowing what goes into the job helps you have better conversations with your contractor and know what to expect.
Step 1: Inspect and Prepare the Roof Deck
Before any tiles go on, the roof deck needs to be solid and flat. Your contractor will remove the old roofing material and inspect the plywood or OSB beneath it. Any soft spots, rot, or damaged sections must be replaced. In Tampa, moisture damage is common due to the humidity, so this step cannot be skipped.
Step 2: Install Underlayment
A high-quality underlayment goes on next. In Florida, a self-adhering peel-and-stick underlayment is often required, especially in certain wind zones. This layer acts as a backup barrier if water gets under the tiles. Florida building codes have specific requirements for underlayment, so your contractor must follow those guidelines.
Step 3: Install Starter Course and Flashing
The starter course is a row of tiles or a special strip installed at the roof’s edge. It supports the first full row of tiles and helps prevent wind uplift. Flashing is also installed around chimneys, vents, skylights, and valleys at this stage. Flashing is one of the most common spots where leaks start, so quality materials and careful installation matter here.
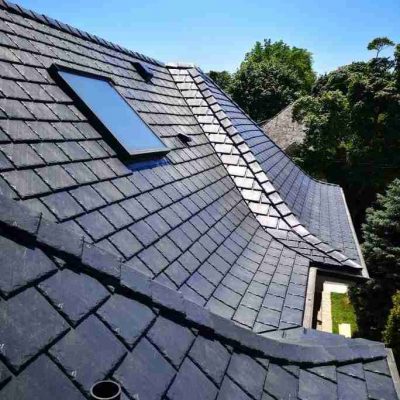
Step 4: Lay the Synthetic Slate Tiles
This is the main installation phase. Tiles are installed from the bottom of the roof up, overlapping each row. The overlap pattern is critical. Too little overlap allows water to penetrate; too much wastes material and adds unnecessary weight. Each tile is fastened with roofing nails at specific points, and the nailing pattern must match the manufacturer’s instructions to maintain the product warranty.
Step 5: Ridge and Hip Installation
The ridges and hips of your roof are finished with special tiles designed for those angles. These cap pieces seal the top of your roof and are often the first thing people notice from the street. Proper installation here also helps with wind resistance.
Common Mistakes to Avoid During Installation
Even experienced roofers can make mistakes with synthetic slate if they are not familiar with the material. One of the most common errors is improper nailing. Driving nails too deep can crack the tile; nailing too shallow leaves them loose. Both cause problems over time.
Skipping the Manufacturer’s Instructions
Each synthetic slate brand has its own installation guidelines. Ignoring these instructions can void your warranty, which is usually 30 to 50 years on quality products. Make sure your contractor has experience with the specific brand being installed on your home.
Another frequent issue is poor flashing work. Water finds its way in at transitions, around penetrations, and at valleys. Cutting corners on flashing installation leads to leaks that may not show up for months but cause serious damage once they do.
FAQ Section
How long does synthetic slate roofing last?
Most synthetic slate products are rated to last 30 to 50 years. Some premium brands offer lifetime warranties. Proper installation and regular maintenance can help your roof reach the top end of that range.
Can synthetic slate handle Florida hurricanes?
Yes, most synthetic slate products are rated for high wind speeds. Many carry ratings of 110 miles per hour or higher. Your contractor should verify that the product meets Florida’s wind zone requirements for your specific location in Tampa or the surrounding area.
Do I need a permit to install synthetic slate roofing in Tampa?
Yes. Tampa and Hillsborough County require permits for full roof replacements. A licensed contractor will pull the necessary permits and schedule inspections. This protects you and ensures the work meets Florida building codes.
How is synthetic slate different from asphalt shingles?
Synthetic slate looks more like natural stone and typically lasts longer than standard asphalt shingles. It also tends to perform better in impact and UV resistance. Asphalt shingles are less expensive upfront, but synthetic slate can offer better long-term value in areas like Tampa where weather conditions are demanding.
Can I install synthetic slate roofing myself?
It is not recommended. Synthetic slate installation requires specific techniques, the right fasteners, and knowledge of local building codes. Mistakes can void your warranty and lead to leaks or structural issues. Hiring a licensed roofing contractor is the safer choice.
Ready to Install Synthetic Slate on Your Tampa Home?
Understanding how to install synthetic slate roofing gives you a clear picture of what the job involves and what to expect from your contractor. It is a detailed process that requires the right materials, proper preparation, and knowledge of Florida’s building requirements.
Suncoast Roofing Solutions has the experience and local knowledge to handle synthetic slate installations across Tampa and the surrounding area. If you are ready to upgrade your roof or want to get a professional assessment, contact Suncoast Roofing Solutions today.